
Trying to build a tiny house on a budget can be a challenge. And it often means calling upon a DIY skill set to make things from scratch instead of buying pre-made. It’s time consuming, but it can save hundreds if you’re careful.
We may have gone a bit overboard on the making, in fact. Our bottom line doesn’t think so, but we spent a lot of time in the shop. What it came down to is this: time or money. You can spend more time doing it yourself or more money to have someone else do it for you. We had more time than money, so we got our hands dirty.
What We Built From Scratch

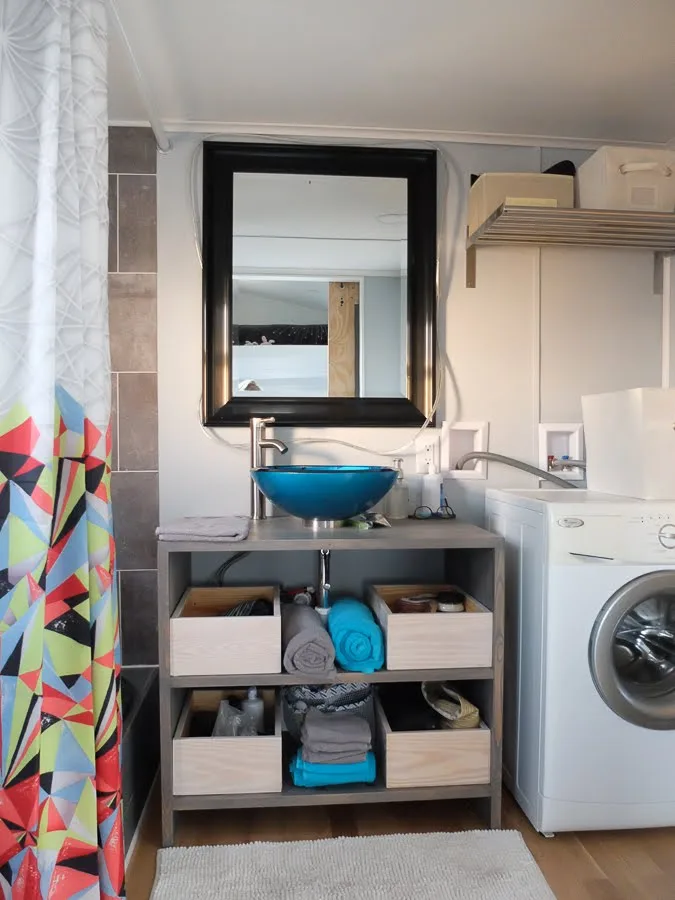
Bathroom Vanity
Building our bathroom vanity was born from something very close to necessity. We could neither find one we liked nor one that was within our budget (i.e. what I thought was a reasonable amount for a box with a couple drawers), not even on Craigslist. The situation was further complicated by the fact that we had purchased a vessel sink on Craigslist and vanities for bowl sinks are more limited. So I got online, found some basic plans, modified them a bit to fit our space, and bought some materials. The slat shelves were cut from a 1/4″ piece of plywood leftover from the sheet we bought for our wall batten strips and the top and legs were nice sheets of Aspen we purchased for about $13 a piece. The boxes were repurposed from a vanity my parents discarded after a flood or made from leftover scraps of the 1/4″ plywood we used for our interior walls. Throw in a can of grey stain for $10 (which we also used for our kitchen counters) and we have ourselves a vanity for scads less than from a big box store. We worked on it in bits and pieces, but all the time added together would probably equal the better part of a day.
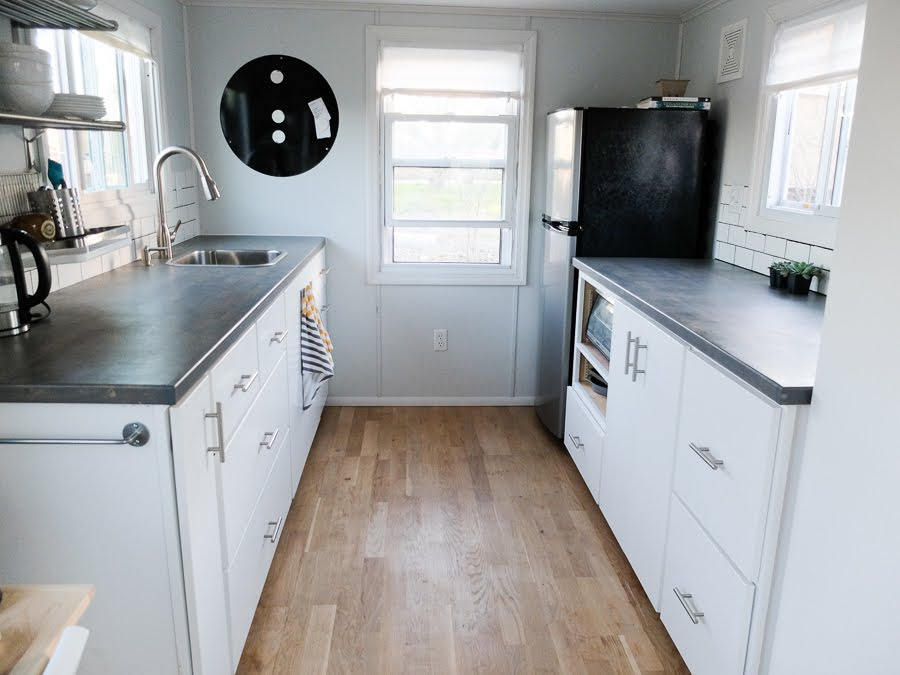
Kitchen Counters and Cabinets
This one is not for the faint of heart (or the novice DIYer). In fact, we wouldn’t have even attempted it if Josh’s dad wasn’t a cabinet maker and kitchen remodeler by trade (Classic Cabinets and Remodeling). He showed Josh how to do it and he spent an entire (very long) day putting the countertops together. Of course, that’s because we approached it in the most complicated way possible. We bought sheets of butcher block for about $80, but they were long and narrow so they had to be put together and mounted on a traditional countertop frame, which Josh also built. It was quite the endeavor. Then we stained them grey (with the same stuff from the bathroom vanity) and put a polyurethane coat ($8) to protect. We were all set to have Josh’s dad build us one using laminate, but it was going to cost twice as much and I hated the thought of all the waste involved, so we did it ourselves. They then spent several long days building the cabinet boxes out of plywood, the doors out of high density fiberboard, and Josh and I assembled and painted it all over another couple days. Materials for the cabinets cost around $250 with all the hinges and hardware and slides and such, some of which we got for free from Josh’s dad. It was a lot of work, to be sure.
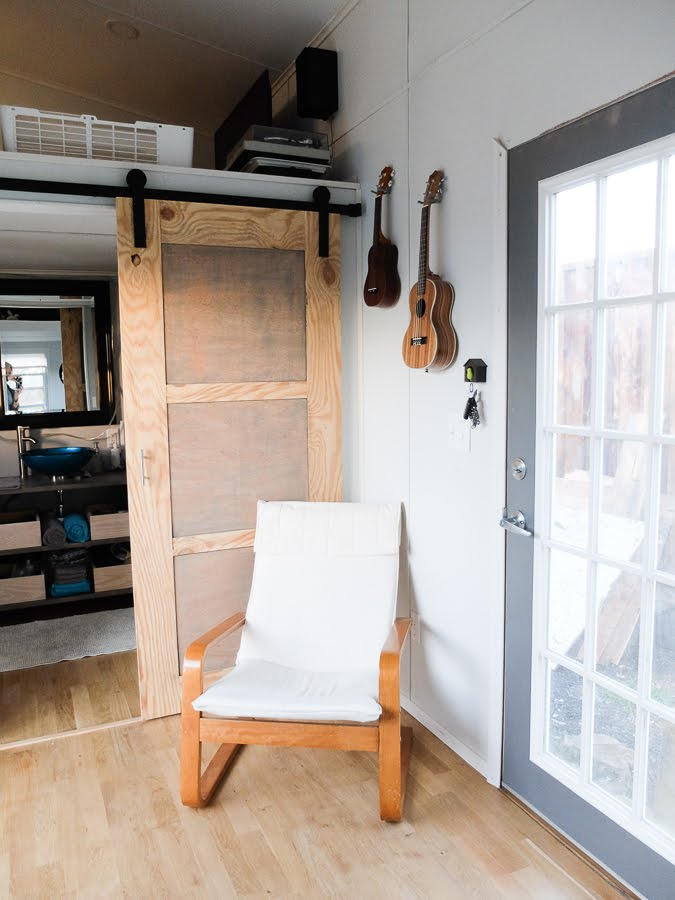
Bathroom Door
Not only is our bathroom opening an atypical size, preventing us from just going out and buying a $5 used door at the ReStore, but we decided we wanted to hang a door using barn door style hardware. Plus neither of us liked traditional panel doors or flat, plain doors, so build we did. And it cost us nothing. We used leftover 3/4″ plywood from our subfloor for the frame and leftover 1/4″ plywood from our interior walls for the three panels. We painted it with interior paint from other projects, which we then decided we didn’t like and sanded off, and mounted it on the sliding barn door track we found online for $40.
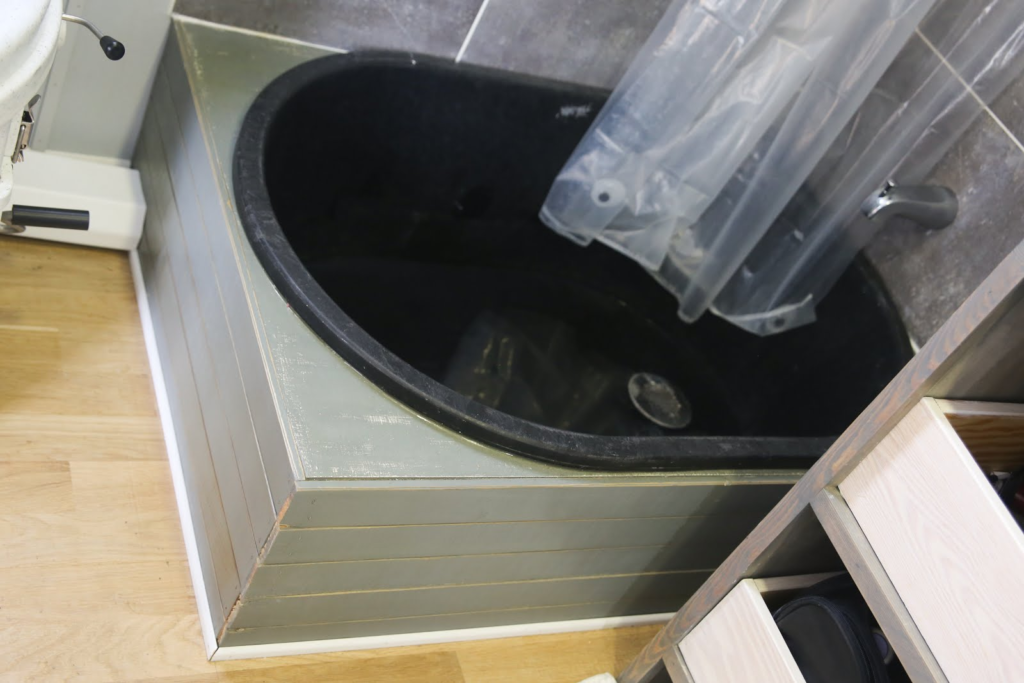
Bathtub
Ok, so we didn’t build the actual bathtub, but we did get pretty creative with the whole situation. We couldn’t find a small bathtub for a reasonable price (like, anything under $300), and I insisted on a tub, not just a shower. So we bought a Tuff Stuff trough at Tractor Supply for $35 and built a box around it for free. We used some nice pallets we found, taken apart, ripped down and routed, and used more leftover 1/4″ plywood layered with thicker stuff for the top. We cut a hole and dropped in the tub, painting the box with leftover paint from other projects and spraying it with a thick coat of polyurethane. It took us most of the evening, but it wasn’t terribly complicated and looks pretty decent. Upon first use, however, we realized water tended to pool in the corners, so we ended up fashioning a full-surround shower curtain rod out of closet rods to keep the water in the tub where it belongs.
Flooring
We didn’t exactly build our flooring, but we put a heck of a lot of work into it. We had started looking for an affordable flooring option here and there when a family friend said he had salvaged a bunch of click-lock floating wood flooring from a barn he helped remodel and it was in great shape. He offered it to us, completely free, but it was the wrong color. And by wrong I simply mean I hate medium-colored wood stain (like walnut). I want my wood dark or I want it light, nothing in between. But we decided to take it and see what we could do. So we used my dad’s planer to shave off just enough off the top to get rid of the finish and stain, then when it stopped working we tried another planer that failed us, then a floor sander that didn’t work, the a series of belt and detail sanders. It was a nightmare. But we finally applied a nice clear coat finish to let the natural color of the wood shine through. Is it perfect? No. Did we save a couple hundred dollars? Yes. And it only cost us the price of a bucket of finish. And about 3 days of work with one or two sets of additional hands.
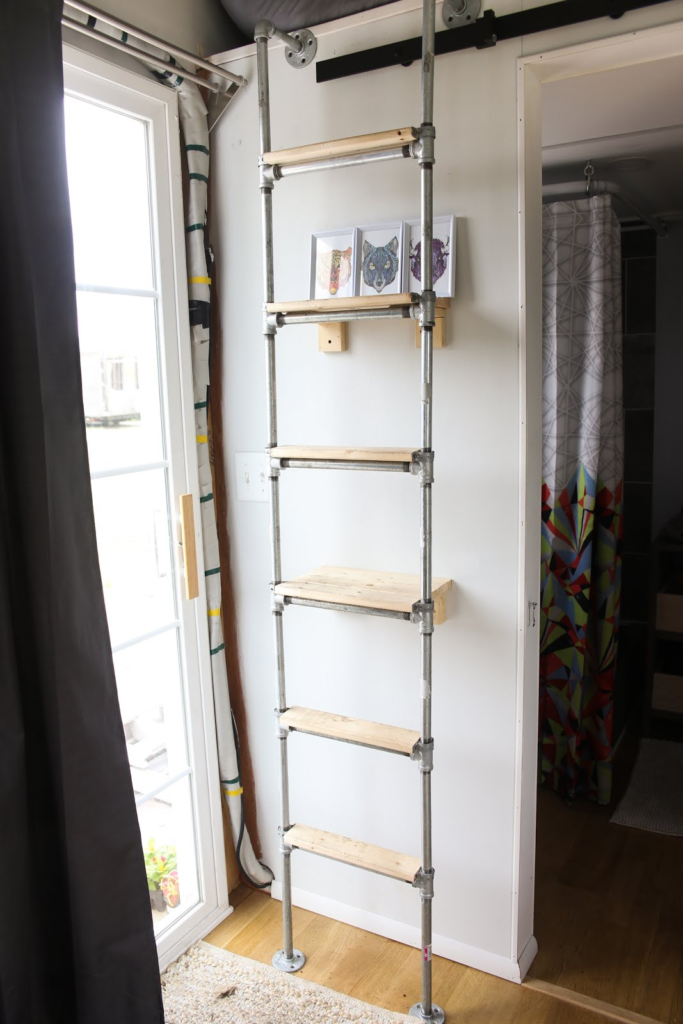
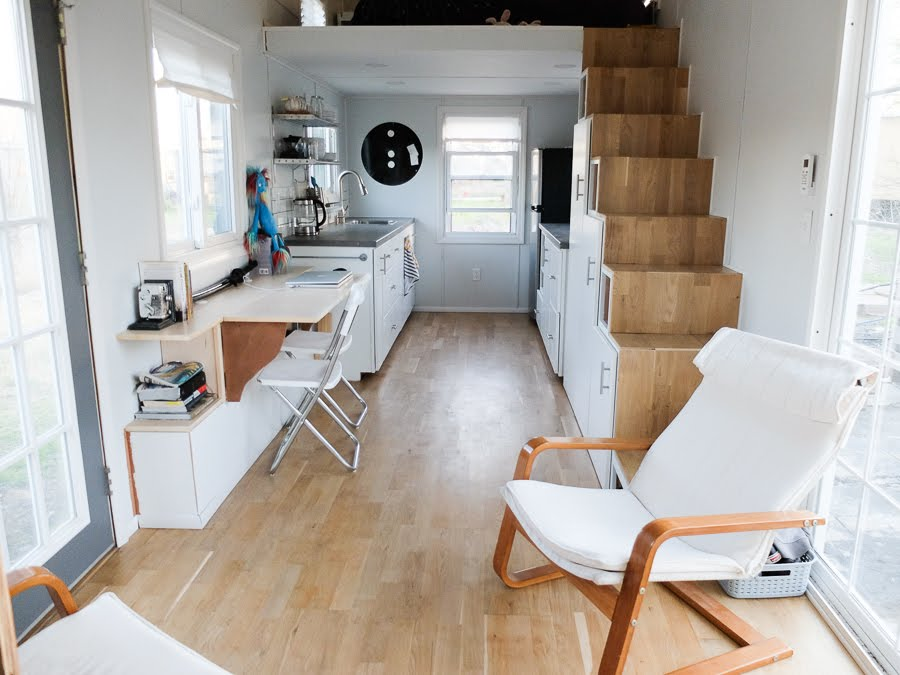
Ladder
We went back and forth a lot on this one. We originally planned to build one out of galvanized pipe to go up to the loft, but when my dad gave me prices for all the pieces required from a business contact, it totaled almost $250! I was not into that. So we thought maybe we would just build one out of wood or buy a cheap one on Craigslist, but easier said than done. So we ended up building a pipe ladder after all, but with smaller pipe and from a cheaper retailer so it only cost us about $80. Still expensive, but it does look cool. It took an afternoon to put together (and then another afternoon to re-put it together after we did it wrong the first time), and then it required a few bucks worth of wood to stabilize it and make it more comfortable, but I’m pretty happy with how it turned out.

Fold-Out Desk
I would have loved to have just bought a desk. Maybe rigged an Ikea deal to work in the space. But because we required something so specific, it was build it ourselves or have an only moderately useful product. Josh’s dad gave us a nice sheet of cabinet-grade plywood to build it and we used scraps leftover from other sheets for the trim and shelves, but it might have cost us $65 or so to purchase the materials. It’s just the right length for both of us to work on our laptops side by side and there’s still room for a few books on the ends. It folds down when we’d rather have room for guests (or yoga), and hides our more unsightly tech gear like cables, cords, hard drives, and power strips. It took about a day to fully assemble and coat with poly and we have a fold-out workspace for both of us.
Alisha is a freelance outdoor journalist and photographer based in Ogden, UT. She loves backpacking, hiking, mountain biking, kayaking and snowboarding (even though she’s terrible at it). She’s also pretty sure she’s addicted to coffee. alishamcdarris.com
Brandy
Tuesday 13th of March 2018
Cool blog! I'm building tiny house too... just finished the framing woot woot. What are the dimensions of your trailer I saw in an earlier post you said 28ft is that counting the tongue? I'm trying to get a rough weight estimate for me. My tiny house is 26 by 8 1/2 built pretty similar.
Brandy
Wednesday 14th of March 2018
Awesome! Thanks :) that means I should be okay haha my trailer is weighted for 14k altogether so I was a little worried but mine is 26 ft and we have a very similar layout. So I'm in the clear! Woot woot great blog keep it up! I hope I'll do some blogging too eventually.
Alisha McDarris
Tuesday 13th of March 2018
Hi, Brandy! The tongue is not included in the 28' measurement and it's 13' 4" tall and 8.5' wide. Ours weighed in at 10,500 lbs. with only a few pieces of furniture.