Hikers & Snowshoers Need to Know About Avalanche Safety, Too. Here are the Basics.

I love hiking in snowy mountains. The views are stunning, the trails quiet, the routes uncrowded, and there’s something special about having to work just a little harder than usual to reach your favorite viewpoint, then treat yourself to a spiked hot cocoa. But avalanche danger in snowy mountains is real, even if you’re not a backcountry skier. So here’s an intro on how to stay safe in avalanche terrain (including being able to identify what avalanche terrain looks like). Yup, even if you’re “just” a hiker or snowshoer.
The Stats
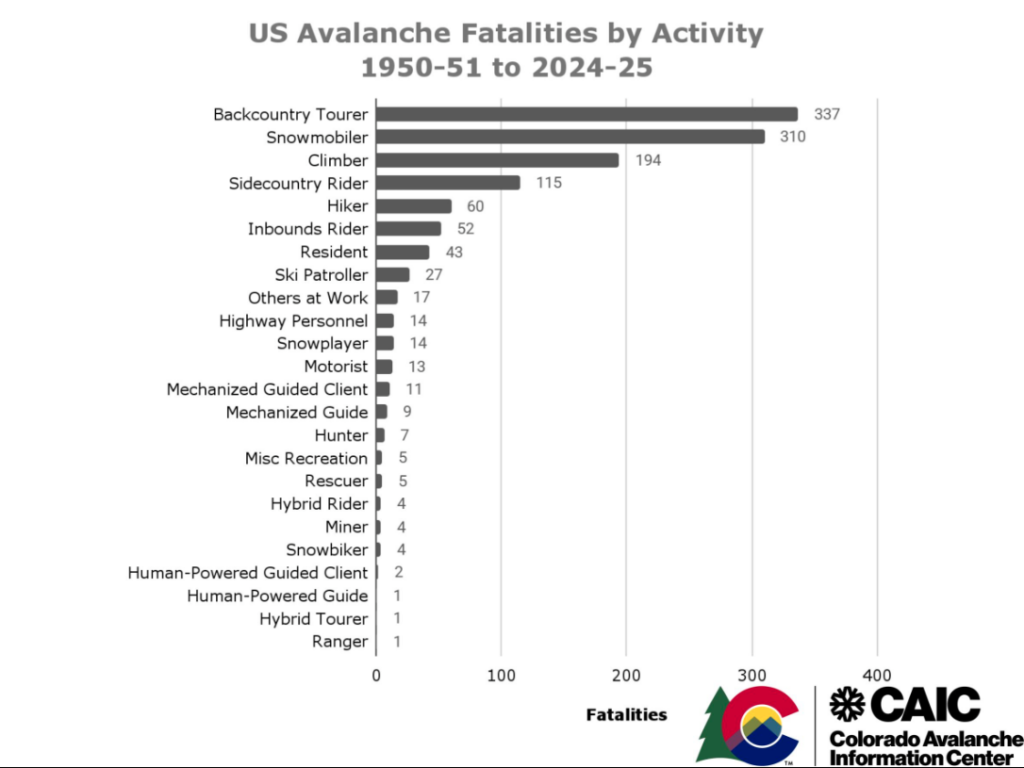
Avalanches kill about 20-35 people across the United States each winter and injure far more. But let’s get one thing straight: while it’s true that backcountry snowmobilers, skiers and snowboarders are the outdoorists who get caught in avalanches the most often by far, hikers and snowshoers are also at risk. In fact, in one tragic accident in Utah in 2014, a hiker got caught and killed in an avalanche just yards from the parking lot.
Your chances may be small, but they’re still there, so always take caution. “Avalanches are equal opportunities killers,” says Drew Hardesty, forecaster for the Utah Avalanche Center. “They don’t discriminate between people recreating in the mountains.” That includes snowshoers.
“If you’re under a slope with snow on it there is an avalanche risk,” warns Doug Workman, avalanche program manager at Mammut. So if you’re recreating in steep, snow-covered terrain, whether you’re skiing, hiking or snowshoeing, you need to know about avalanche danger.
What’s more, avalanches can happen anywhere, including in foothills and near roads and trailheads. You don’t have to be deep in the backcountry to tangle with an avalanche. Plus, Workman adds, “The more time you spend in avalanche terrain the more likely you are to get caught in an avalanche,” especially if you don’t have the tools or know-how to protect yourself.
This isn’t meant to sound scary, but honest and realistic. Also, to encourage you to head out there prepared. Just remember: “safe” is relative. There is inherent risk in any mountain travel and you should always recreate with caution, especially in winter.

First Things First
For starters, it’s important to understand the three main things that cause avalanches, often referred to as the “Avalanche Triangle”:
- Terrain: Anything between a 30-45º slope is considered a high-risk area for slides.
- Snowpack: All kinds of things from weather to temperature to alternating layers of wet and dry snow can make snow unstable.
- Weather: Things like wind, temperature and precipitation can make slabs and avalanches more likely to slide.
When conditions are right (or wrong) any of the three can overlap and cause a slide. But there’s one thing that can compound and elevate the risk: human behavior. Our presence and cognitive biases can lead us to make choices that aren’t smart, thus triggering an avalanche when other forces are already leaning in that direction.
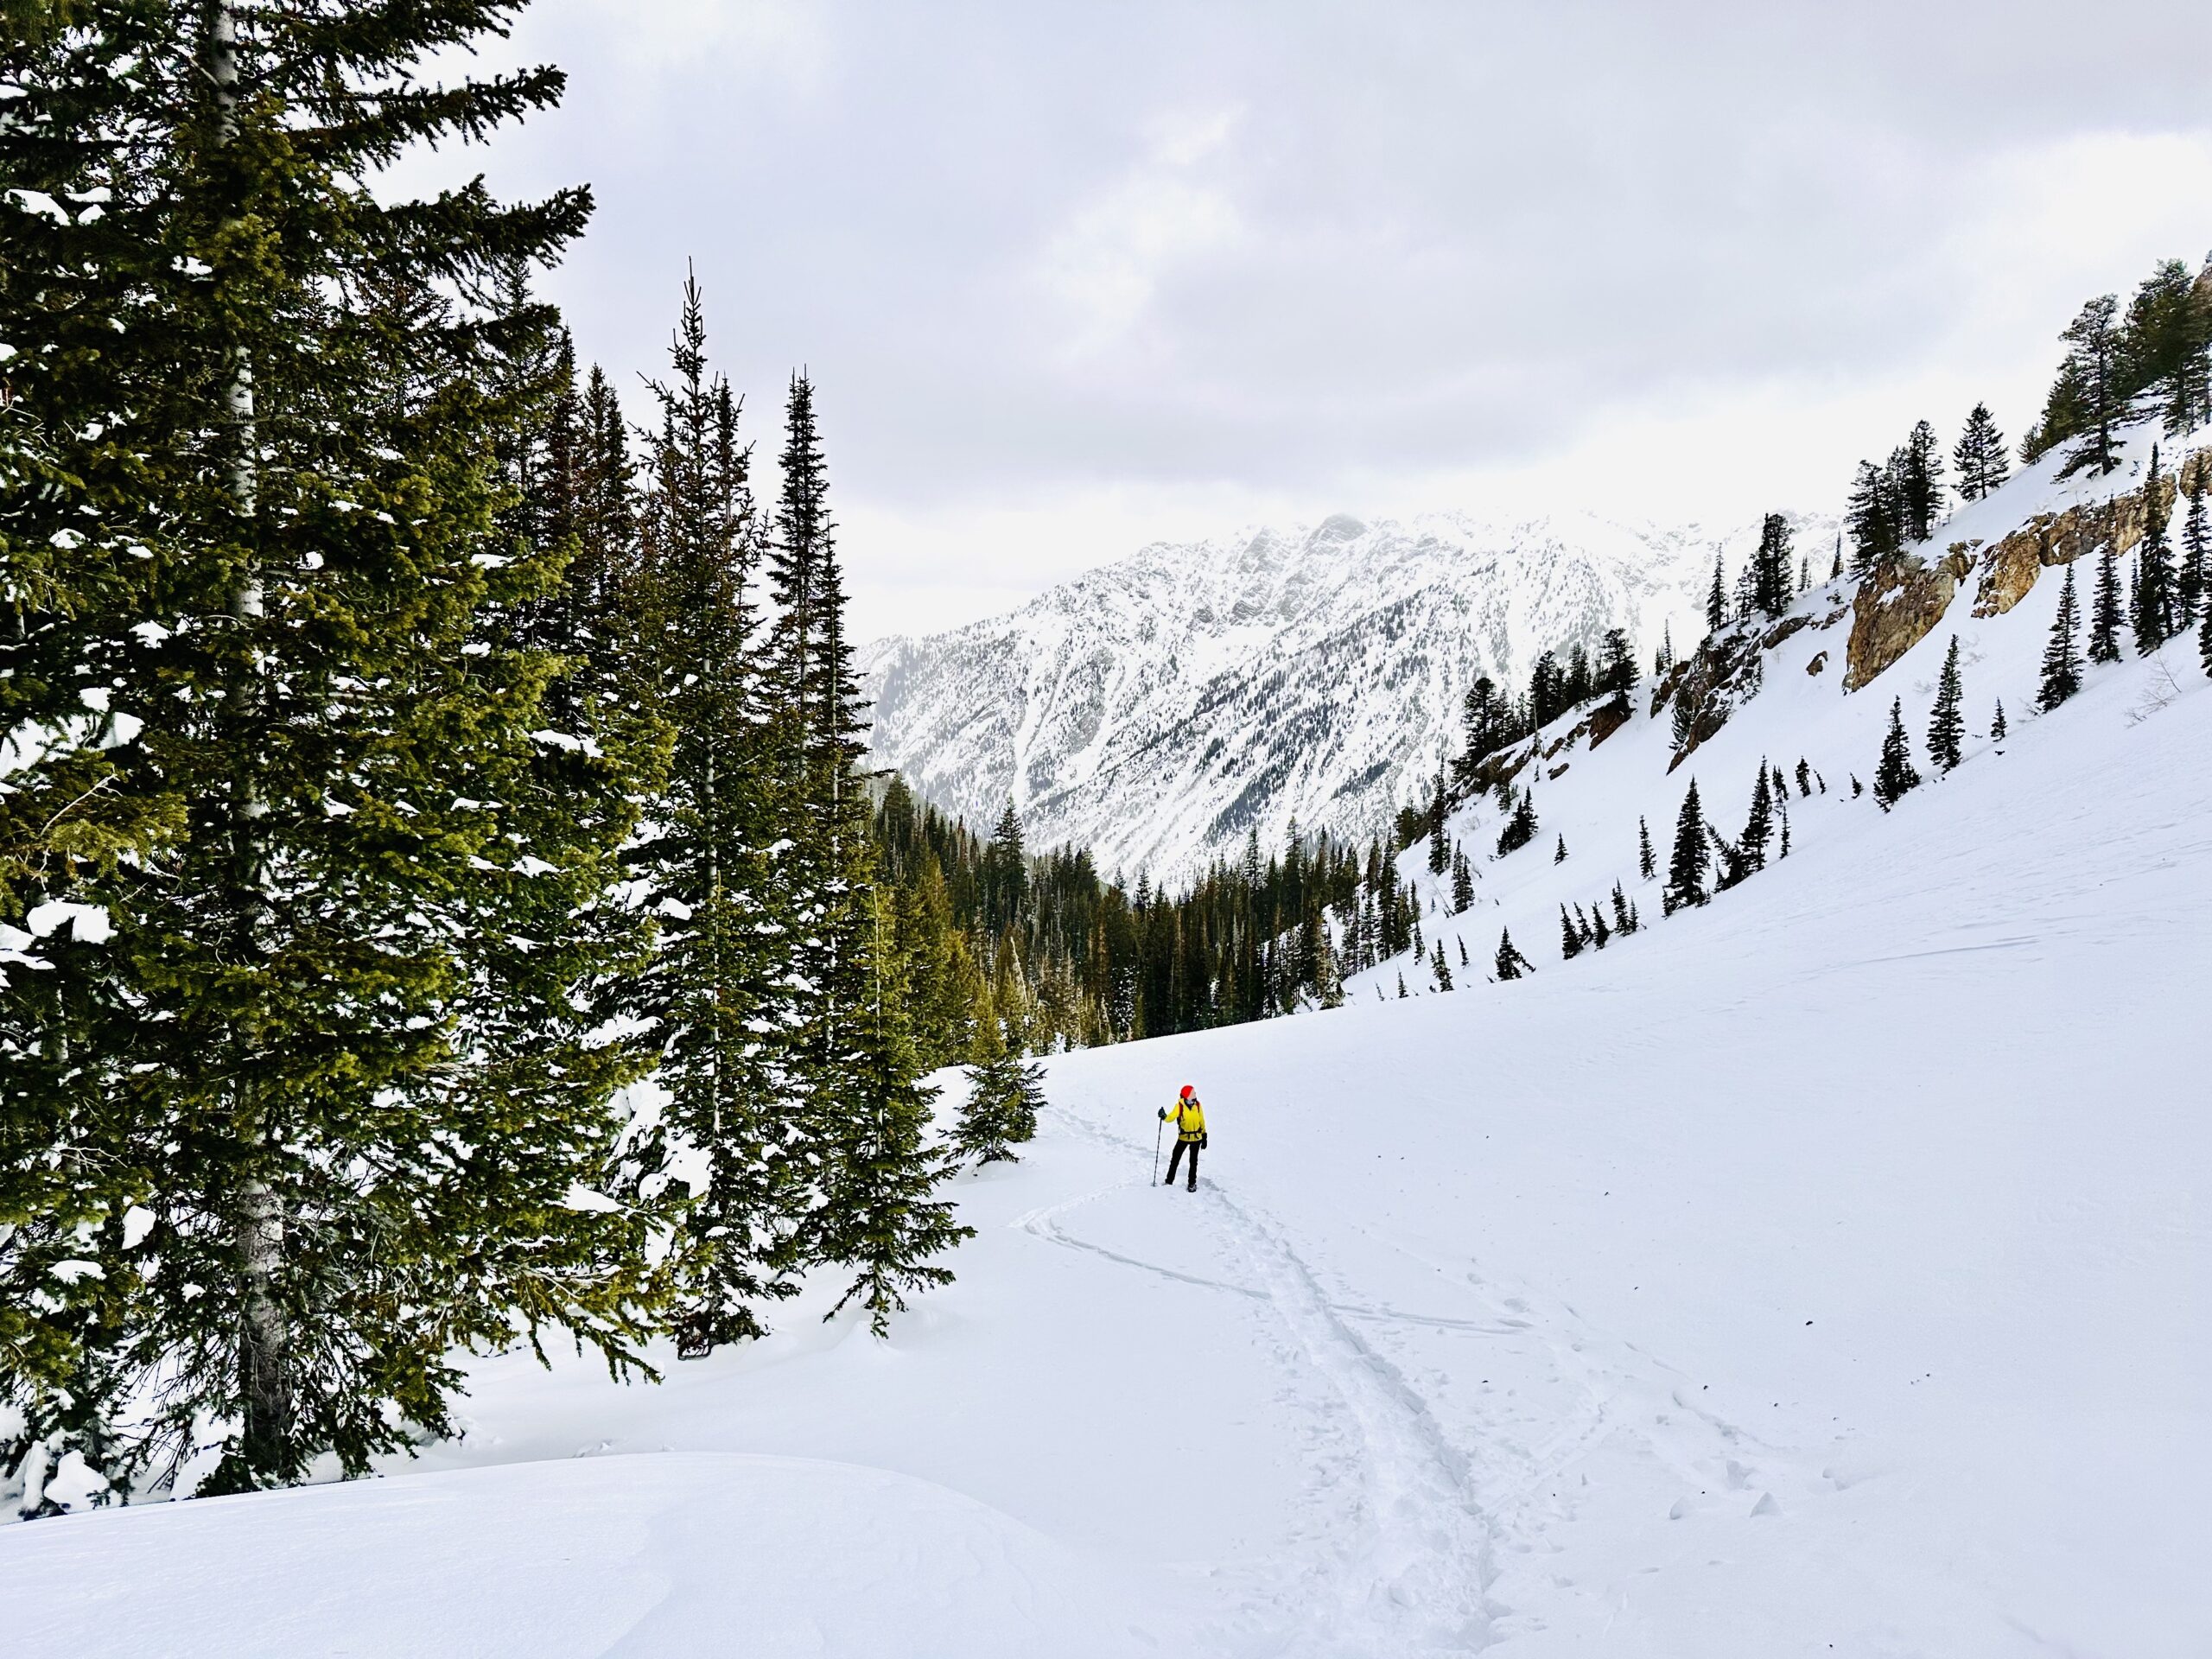
And unlike with backcountry skiing or snowboarding that requires slopes to ride down, hiking and snowshoeing does not. So you can, and maybe should, choose trails that avoid danger zones altogether, Workman advises.
Avalanche Glossary
Before we get too deep into it, here are some terms you may or may not be familiar with that are commonly used when talking about avalanches:
- Snowpack: This refers to “The accumulation of the entire season’s snowfall, which is layered and inhomogeneous across the terrain,” according to Avalanche.org. The snowpack is dynamic, always changing thanks to temperature shifts, snowfall and moisture levels. These layers can even vary across the terrain, and it’s those layers and the relationships between them (weak or strong) that determines avalanche potential.
- Beacon: A device worn by backcountry users to locate people buried in avalanches.
- Probe: A long, thin, collapsible rod used by a rescuer to pinpoint the location of an individual buried beneath the snow.
- Slope Angle: The angle/steepness of the slope. Anything under 30º and above 45º is generally considered safe. Anything between 30-45º is a danger zone.
- Slope Aspect: What direction the slope is facing (north, southwest, etc.)
- Stability: The chance that an avalanche may occur given a trigger like a human snowshoeing.

Avalanche Safety: What Hikers Need to Know
There’s lots to learn about avalanche safety and many technical books on the subject. But for hikers and snowshoers, here’s what you should know before you head into snowy mountains.
1. Check the Avalanche Forecast
“The first stop should be to see what the avalanche conditions are,” Hardesty advises. And that means checking the avalanche forecast. You can even sign up for daily emails from local avalanche centers if you live in mountainous regions.
The forecast is a visual 3-D representation (pictured above) of the danger rating based on elevation and slope aspect. It’s often followed by a description of what specific conditions to watch out for based on recent weather in your area. For those who prefer to keep it simple, this is the first and best tool for assessing risk and helping you choose the best routes. Read this article for more information on how to read the forecast, but these forecasts are free, easy, and require limited training to understand.
If danger is low, generally conditions are deemed stable and normal caution is advised. For anything more, consider avoiding trails in avalanche territory altogether. For those who prefer to keep it simple, this is the first and best tool for assessing risk and helping you choose the best routes. Don’t want to raise the risk level? Hike somewhere else.
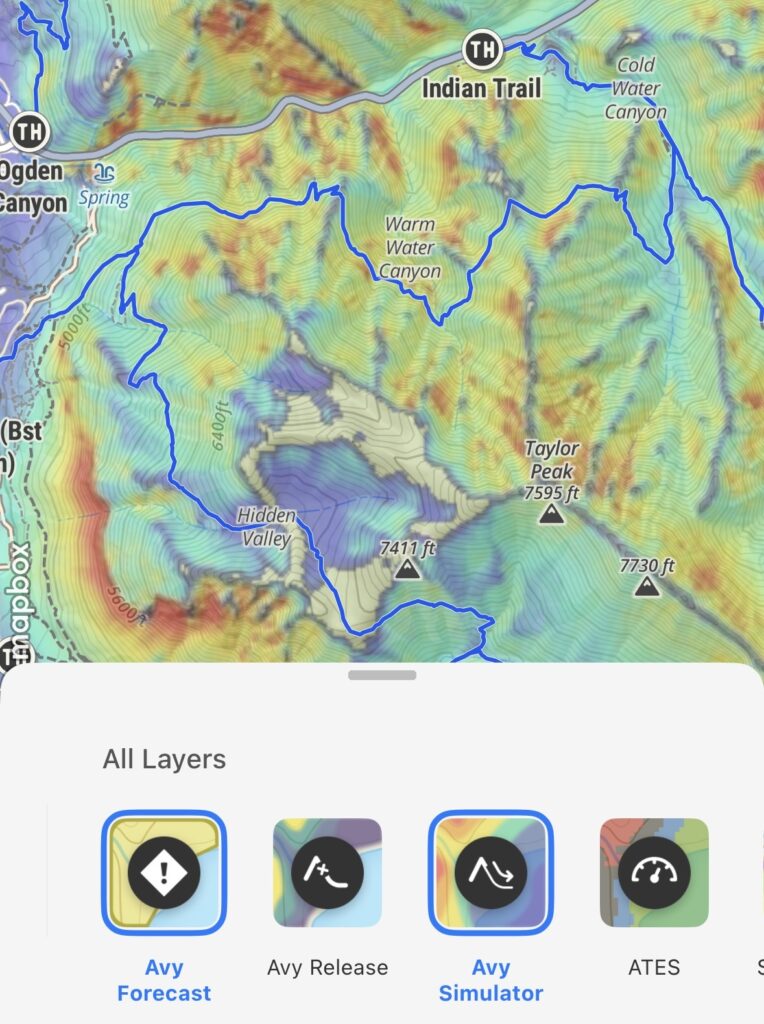
The OnX Backcountry Avalanche Simulator. 
The OnX Backcountry Avalanche Forecast.
2. Use Apps
The next step that doesn’t require much training is to utilize advanced apps on your phone. I like OnX Backcountry for this, but Gaia is a solid choice, too. Even AllTrails has warnings in individual hike descriptions that let you know if the trail is in avalanche terrain and what the current danger level is.
OnX Backcountry is a bit more advanced. In paid subscriptions, the app allows you to check the avalanche forecast via colored overlays, but you can also check slope angle (more on that in a minute), danger ratings and avy likelihood for any given area, and avy path predictions based on advanced geological data. It’s pretty cool. Once you get the hang of the tools, they can help you select and build a hiking route that’s as safe as you want to make it.
Look for specific apps for your region, too, like the Wasatch Backcountry Skiing app. Just remember: “They’re planning tools,” Hardesty says. They offer guidance, not a guarantee, so you should still use the other skills and tools at your disposal.
You can also carry a slope meter to check slope angle. Or download a level app, hold it parallel to the slope in question, and determine if it’s in the danger zone between 30-45º.
3. Know the 5 Red Flags of Avalanche Awareness
The first thing you’ll likely learn about avalanche safety besides the slope angles to watch out for is the Five Red Flags, signs and signals that the snowpack might be unstable and prone to slides:
- New snow: 90% of human-triggered avalanches happen during or within 24 hours after a storm. That’s because heavy snowfall or rain can load slopes with too much weight at once and make snowpack unstable for several days.
- Recent Avalanches: If there’s been a recent avalanche nearby on a slope that’s similar to the one you want to hike (in elevation, aspect and slope angle), then there’s a good chance the snow pack is weak where you are, too.
- Cracking and collapsing: If you feel the snow collapse under your snowshoes, hear whomping sounds when your step, or see cracks in the snow shoot out in front of your feet, that means there’s a collapsed layer in the snowpack and conditions are dangerous.
- Rise in temp: Extended periods where temps are above freezing or a rapid rise in temps can melt the upper layers of snow, weakening the bonds between layers and causing slides.
- Strong winds: Winds strong enough to transport snow and cause drifts mean there doesn’t have to be new snow to cause instability in the snowpack. They can also create cornices–unsupported extensions of snow that hang over the edges of peaks and ridges–that can collapse and cause avalanches.
That said, “A huge part of [avoiding danger] will be understanding the terrain and what’s above you,” Workman says. If you’re on or under a steep slope covered in snow, use caution.
4. Get Educated
Beyond learning the basics and red flags to watch out for, if you plan to hike and snowshoe in snowy mountain environments often, it’s worth it to spend some time and money on education. Start with free online programing like that offered from Know Before You Go (KBYG). You can do it in the comfort of your living room and get schooled on avy safety basics.
For more advanced learning, sign up for a Backcountry 101 course (these usually offer a beginner-to-intermediate education) or an avalanche safety course near you. Where can you find an accredited avalanche safety course? Start at the AIARE website. It lists upcoming course availability and partners so you can be confident you’re learning the right stuff and getting the right accreditation. This is a bit of an investment, but over a day or two of in-person, hands-on education, you’ll learn a lot, be able to practice techniques and be shown how to asses and avoid danger and use safety tools in an emergency.
If that all seems like too much, the safest choice when recreating in the mountain in winter, is avoiding avy terrain altogether, Workman advises.
5. Carry the Right Tools
I saved this tip for last because it doesn’t help to have recovery tools if you don’t know how to use them. So make sure you get some education first, either during a backcountry safety class, AIARE training or via YouTube videos at the very least.
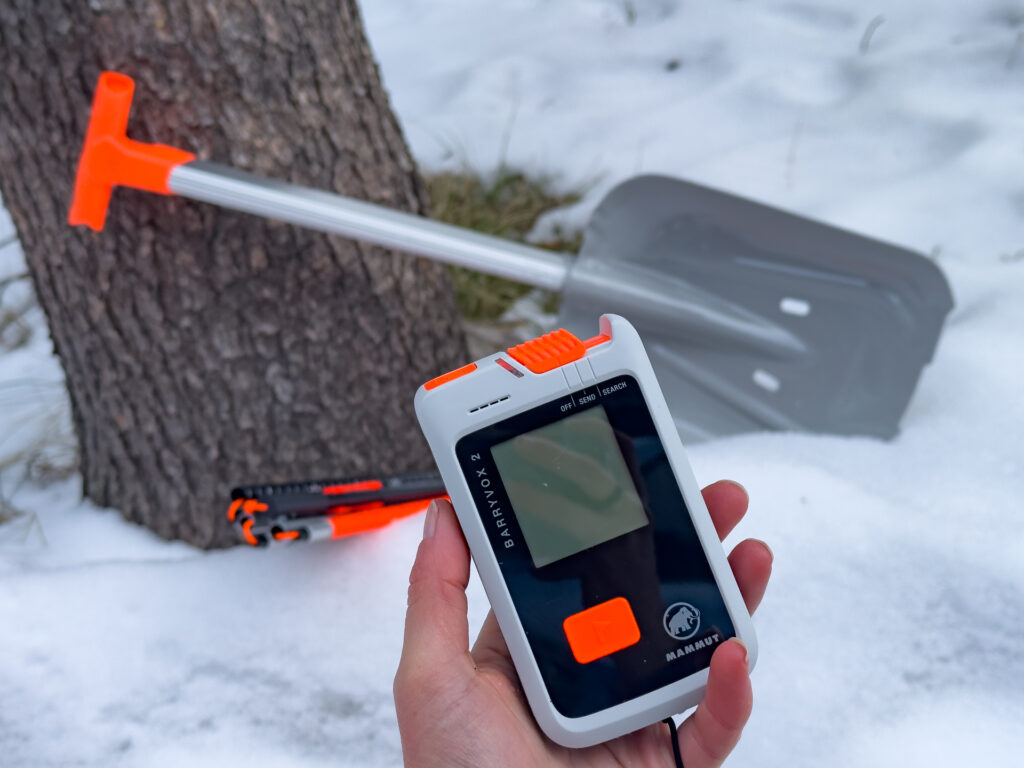
Then acquire and carry the tools you need. Full disclosure: They won’t be cheap. But You can often find used beacons if not shovels at local second-hand gear stores or online. What are the essential items for avalanche safety in the backcountry? Avalanche safety equipment includes a beacon, probe and shovel, all of which are only helpful when you’re with another person as they’re all designed for rescuing someone else, not yourself. So have everyone in your group carry rescue equipment if possible, just like backcountry skiers should.
Do you need an avalanche air bag? That’s up to you. The price is high but they do increase survival rates a bit, so if you’re regularly heading into moderate avy terrain or carrying one makes you feel safer out there, go for it. But if that’s an investment you’re not willing to make, consider staying in low danger zones. As for the other safety gear, buy a whole kit instead of piecing one together to make it easy. We like the Mammut Barryvox 2 Tour Package.

Bottom Line
In short: “Know what the avalanche conditions are for the day and choose the appropriate route based on the terrain,” Hardesty says. Don’t think that just because you’re not doing “extreme” things deep in the backcountry that you are immune from avalanche danger. “Avalanches can happen anywhere the conditions are right.” Don’t get lost within advanced snow science; learn what is and isn’t avalanche terrain, know how to perform companion rescue with a beacon, shovel and probe, and be able to interpret avalanche forecast on-snow cues to know when local conditions are unsafe.