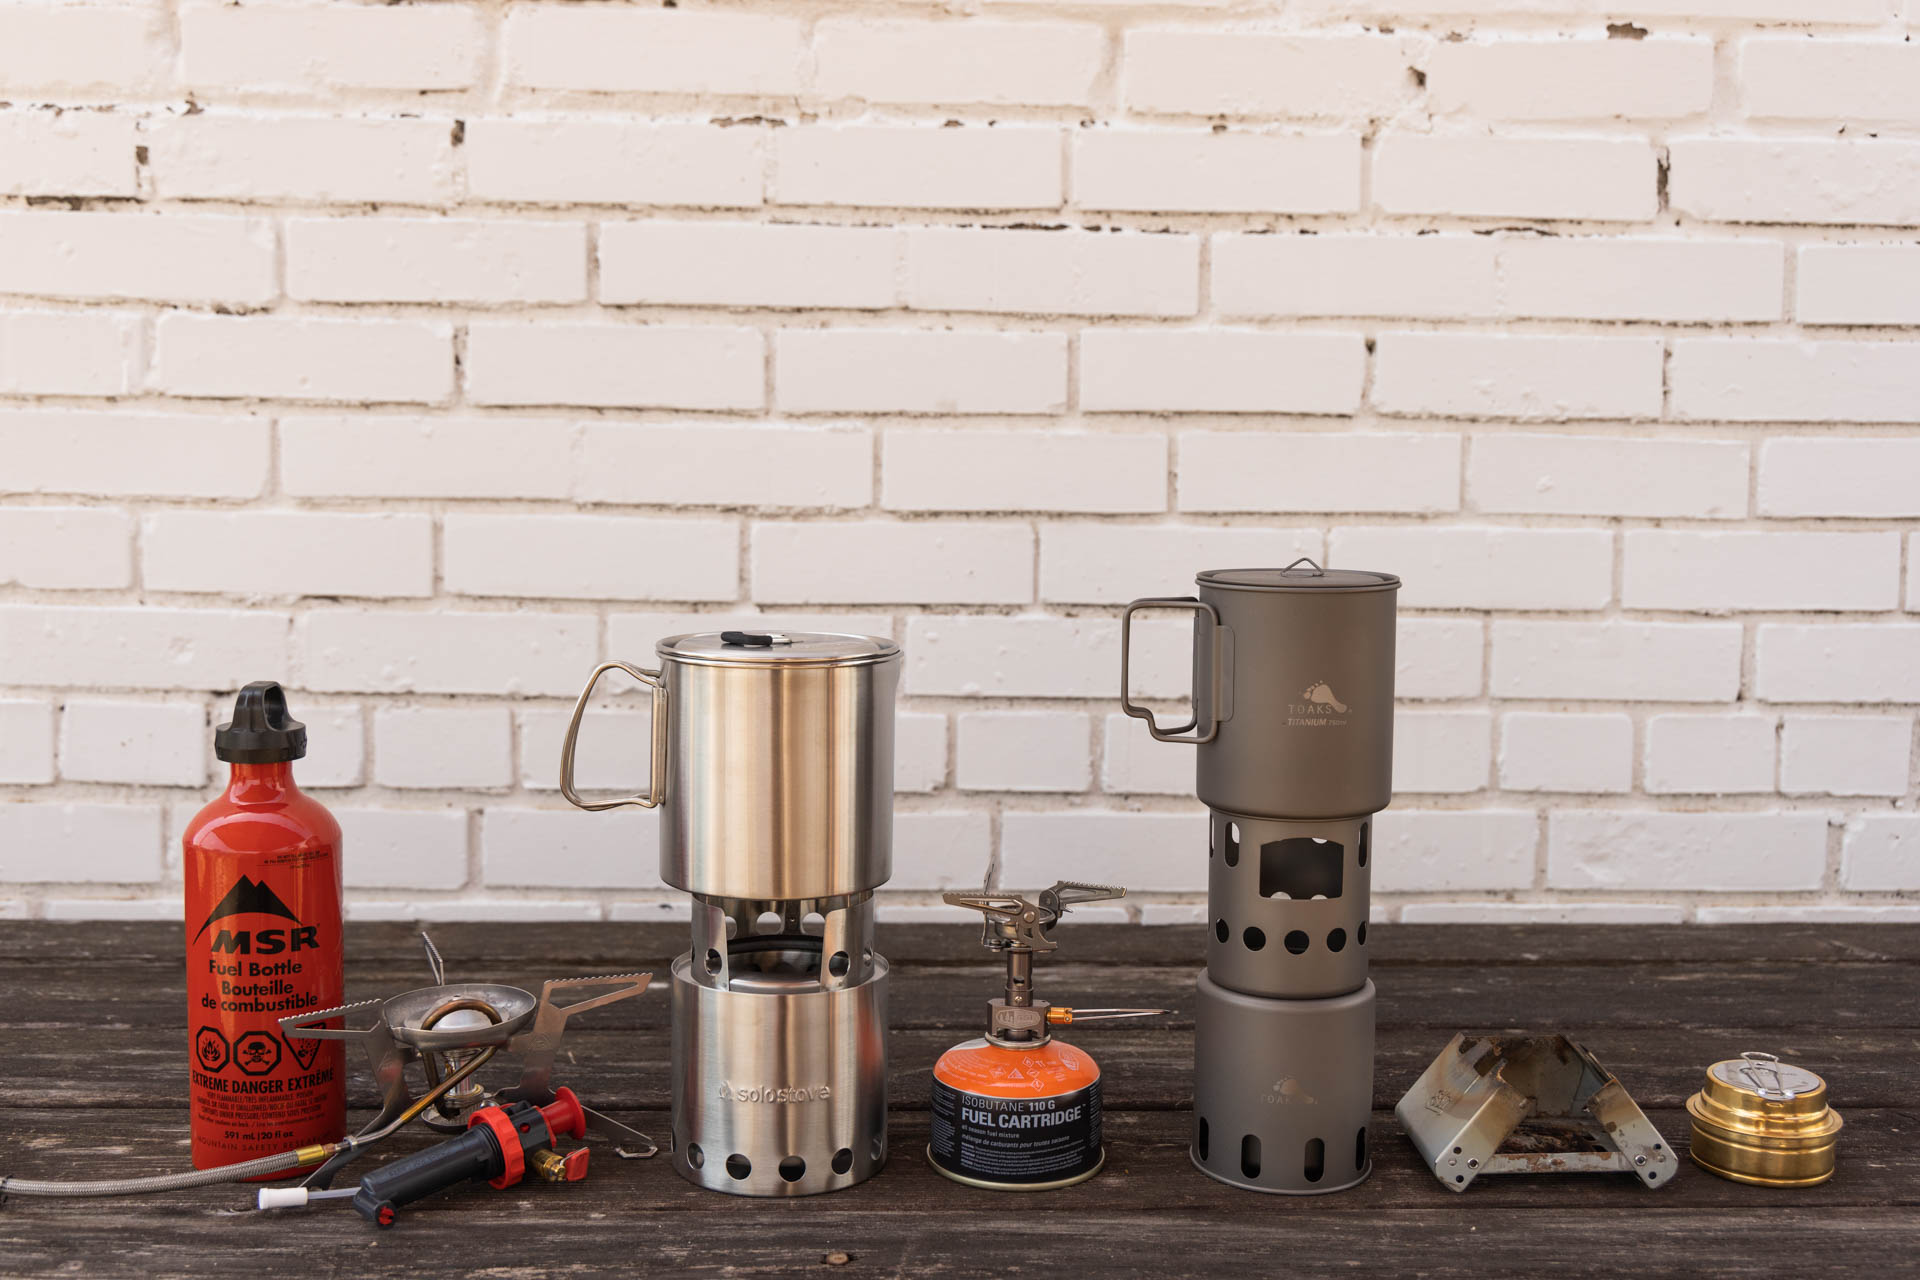
The Best Backpacking Stoves: How to Choose The Right One for Every Adventure
There are dozens of backpacking stoves to choose from these days: alcohol stoves, canister stoves, wood-burning stoves, tablet stoves, I could go on. But it can be difficult to know how to choose the best backpacking stoves for every adventure.
After all, some are easy to use but weigh a lot, while others are lighter, but fuel can be tricky to find. Still others can’t be used during dry seasons or in extreme cold. So what’s the best backpacking stove and which one is right for you? We’ll break down the 5 main types, what they’re each good for, and when you might want to choose one over another.

Backpacking Stoves: Good, Better, Best
First things first: when it comes to picking the best backpacking stove, there is no objective right or wrong, better or best; when it comes to cooking your ramen in the backcountry, it’s very much a matter of preference, style, and destination. Some camp stoves are best for certain conditions or locations, but even then, it’s largely a matter of personal choice. So we’re gonna compare the 5 most popular options, talk about what each one is best for, why you’d want one over another, and, because it’s good to know, how fast they boil water. So let’s do it!
*Right after a little disclaimer. We tested these stoves close to sea level in warm summer temperatures. Below freezing and at higher altitudes, water boils slower. I’m just sayin’, don’t come cryin’ to me when I tell you how long it takes to boil a cup of water and you don’t experience the same exact results. That’s just how it is. Physics and science and stuff. K? K.
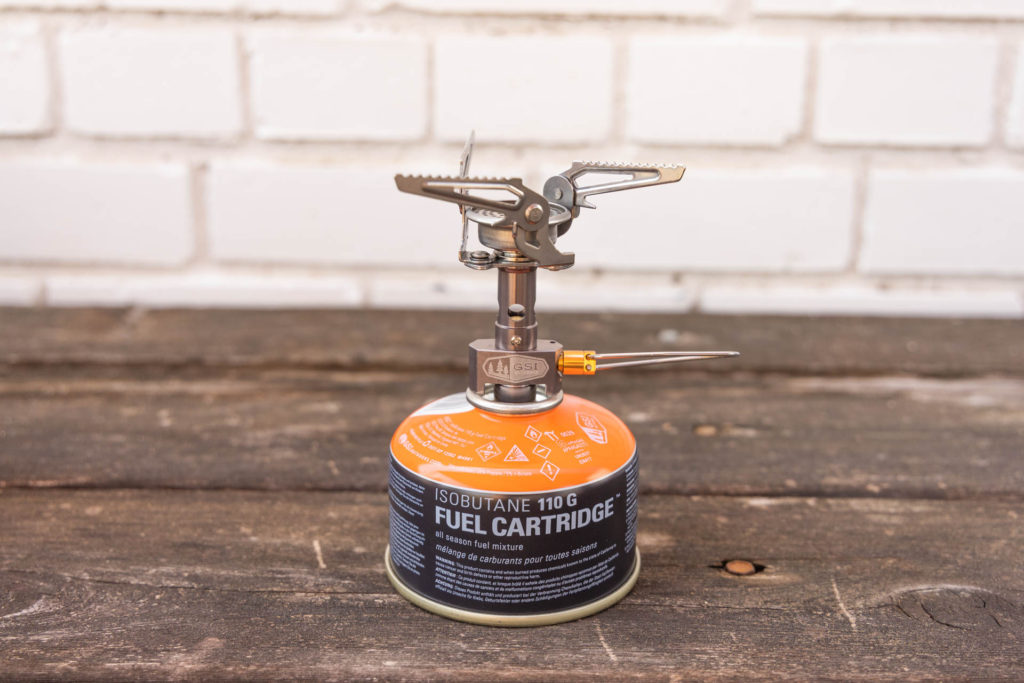
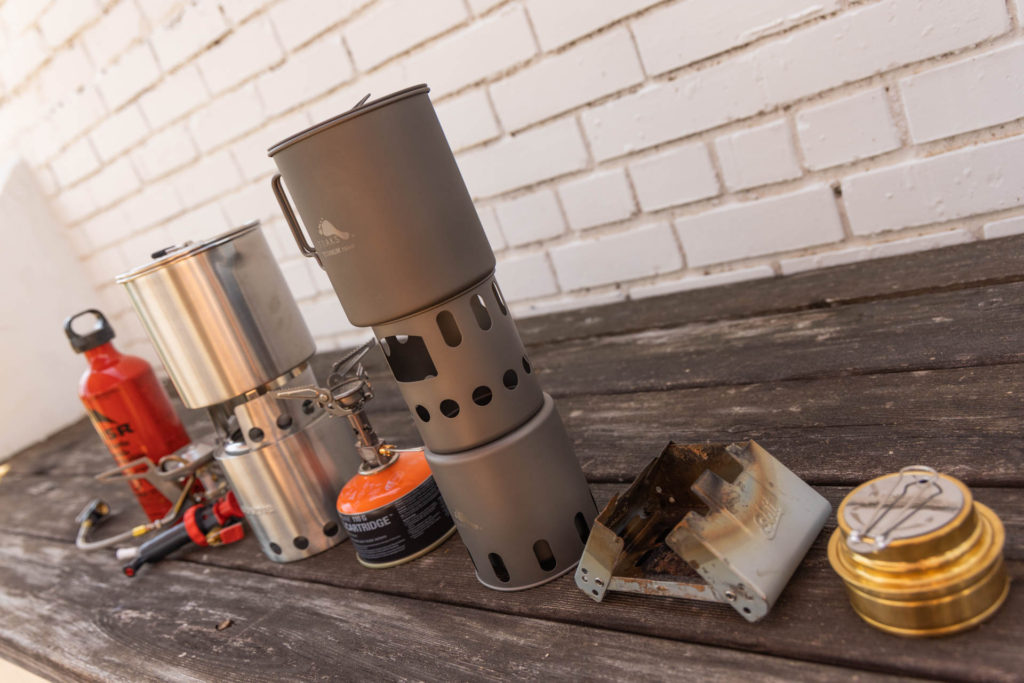
1. Canister Stove (aka: The Standard)
The classic canister stove is a classic for a reason: Not only is it most backpackers’ first stove, but it’s also their last. It’s the do-everything workhorse of the camp stove lineup. It’s typically the most versatile, reliable, and hardworking option available.
A canister stove is dubbed such because it is comprised of a pressurized canister of fuel that your screw a (usually very small) stove onto, like the GSI Pinnacle (though stoves come in a variety of shapes and sizes from a number of different brands). You twist a fuel release to get the gas flowing, light with a match or igniter, turn up the flame, and start cooking.
Pros:
- Boils a cup of water fast: 1 minute, 20 seconds.
- IsoPro fuel canisters are easily found at pretty much every outdoor store.
- Flame is adjustable for more precise cooking or boiling.
- Not super expensive (the GSI Pinnacle backpacking stove is $50).
- Reliable.
- Easy to use.
Cons:
- Canisters are heavy, even when they’re empty.
- Fuel canisters aren’t cheap: a small 5 oz version costs around $6 and will probably only last for a weekend trip if you’re feeding two people.
- Empty canisters are difficult to recycle. You have to purged any remaining gas, poke a hole in the canister, then recycle it.
- Doesn’t work in temperatures below 20º F (give or take)
Who Canister Stoves are For
Canister Stoves are a good choice for backpackers who tend to camp in mild, 3-season temperatures (spring, summer, fall) and want an easy, reliable, fast-cooking setup that just works without any fuss. That can just be pulled out, set up in a snap, and used to prep all manner of meals from boiling to sautéing.
However, if you’re an ultralight backpacker, a canister stove isn’t going to be your favorite thing to pack as the fuel canisters are heavy. They also aren’t a suitable choice for winter backpacking. But if you’re only gonna have one stove and you’re not fussy about weight, this is the one to get. Who is it not for? Hard-core ultralighters and people camping in temps below 12 degrees Fahrenheit.
Find the GSI Pinnacle backpacking stove here.
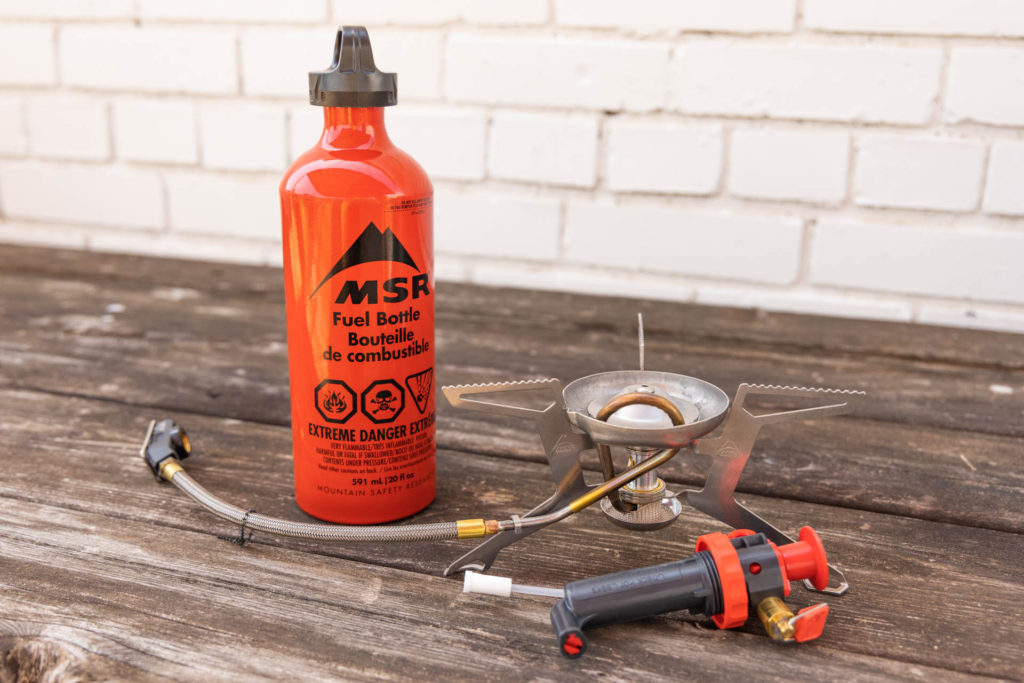
2. Liquid Fuel Stove (aka: The Winter Workhorse)
A liquid fuel stove works similarly to a canister stove, but with 4-season functionality and occasionally a ton of versatility. It features a stove attachment similar to a canister stove, but usually larger, and runs on liquid fuel like white gas or even unleaded gasoline. Some, like this MSR Whisperlite Universal, even offer the versatility of an inverted canister setup where the canister is attached to a hose that allows you to use IsoPro fuel in slightly colder temps than on its own.
But more important is the liquid fuel functionality: pour white gas into a dedicated fuel bottle that can be pressurized by pumping out the air to make it more efficient in cold weather. Hook the now pressurized bottle up to the hose, let a little fuel drip into the stove, light and cook (make sure to follow manufacturer directions closely).
Pros:
- Boils a cup of water fast: 2 minutes 45 seconds.
- Super versatile: it can run on several different fuel types.
- Flame is adjustable for more precise cooking or boiling.
- Dedicated Bottles (sold separately) are reusable and white gas comes in easily recyclable cans.
- Works in temperatures well below freezing.
- White gas burns fairly clean and is cheap: about $11.50 for a gallon, which will last for many trips.
Cons:
- Stove and fuel bottles are bulky and heavy.
- Liquid fuel stoves aren’t cheap: this MSR Whisperlite Universal costs $170.
- White gas isn’t as readily available as IsoPro canisters; you may have to shop around.
- Require more maintenance than other stove types.
Who Liquid Fuel Stoves are For
For reliable and fast cooking with tons of versatility when winter backpacking, a liquid fuel stove, especially one that offers the universal functionality that comes with the ability to run on a handful of fuel sources depending on where you are in the world and what the temperatures are, a liquid fuel stove may be for you.
They’re not small or ultralight, though, so if you’re looking for space or weight savings, look elsewhere. And you will need to carry any repair tools that come with the kit when you backpack as these types of stoves are notorious for needing a little extra care and maintenance. But for non-ultralighters, a liquid fuel stove is frequently the winter camping stove of choice.
Check out the MSR Whisperlite Universal here.
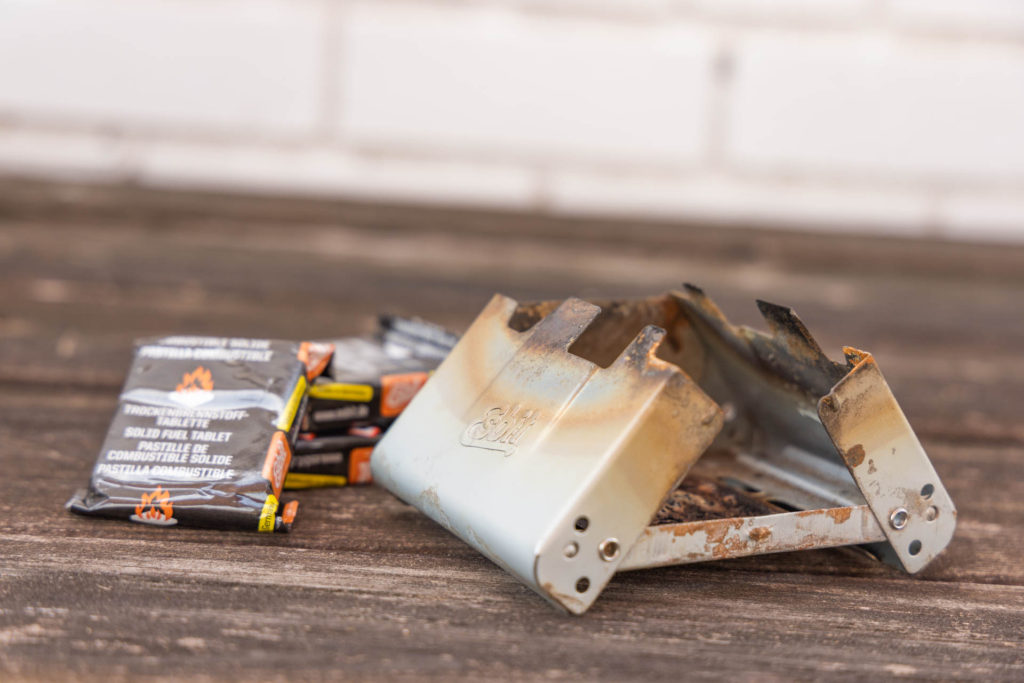
3. Solid Fuel Stove (aka: The Ultralight One)
Now, if you want ultralight, a solid fuel tablet stove is an easy-to-use option for gram-counters. This Pocket Stove from Esbit, for example, utilizes a tiny little folding box (you can use a variety of different containment devises, but this is one of the smallest and lightest) inside which you toss a tablet of solid fuel. Place a pot or small pan on top, light the tablet, and wait.
Pros:
- Stoves and fuel are super light: just 180 grams for the stove and .5 oz per fuel cube.
- Pack exactly as much fuel as you need.
- No heavy empty fuel containers to pack out.
- Easy to use: just unwrap a tablet and light.
- Fuel and stoves are inexpensive: 12 half-ounce cubes cost $9, the Esbit stove costs $13.
- Tablets light easily and burn reliably in any temperature conditions, including sub-zero climates.
- Tablets come in multiple sizes.
- White gas burns fairly clean and is cheap: about $11.50 for a gallon, which will last for many trips.
Cons:
- Boils a cup of water slowly: 5.5 to 6 minutes.
- Fuel tabs smell strongly of fish before they are burned (you’ll need to carry them in a zip-top bag).
- Usually have to use a whole tablet.
- Don’t burn clean: There will be char on the bottom of your pot.
- Creates waste: tablets are individually wrapped in foil-lined plastic like a candy bar, which is difficult–if not impossible to recycle.
- No control over temperature, so it’s best for just boiling water.
Who Solid Fuel Stoves are For
Those who are likely to find solid fuel stoves the best backpacking stoves for them are ultralight backpackers or those who want a fuss-free cooking setup that requires no maintenance or attention at all: those who want to simply set it and want to carry just as much fuel as they need without sweating the weight if they happen to bring too much, no matter the temperature outside.
But this system is likely better for experienced backpackers who would rather trade the comfort, convenience, and quick-cooking of a canister stove for a lighter pack and more streamlined system (and who don’t mind the smell of fuel tablets).
Find the Esbit Pocket Stove here.
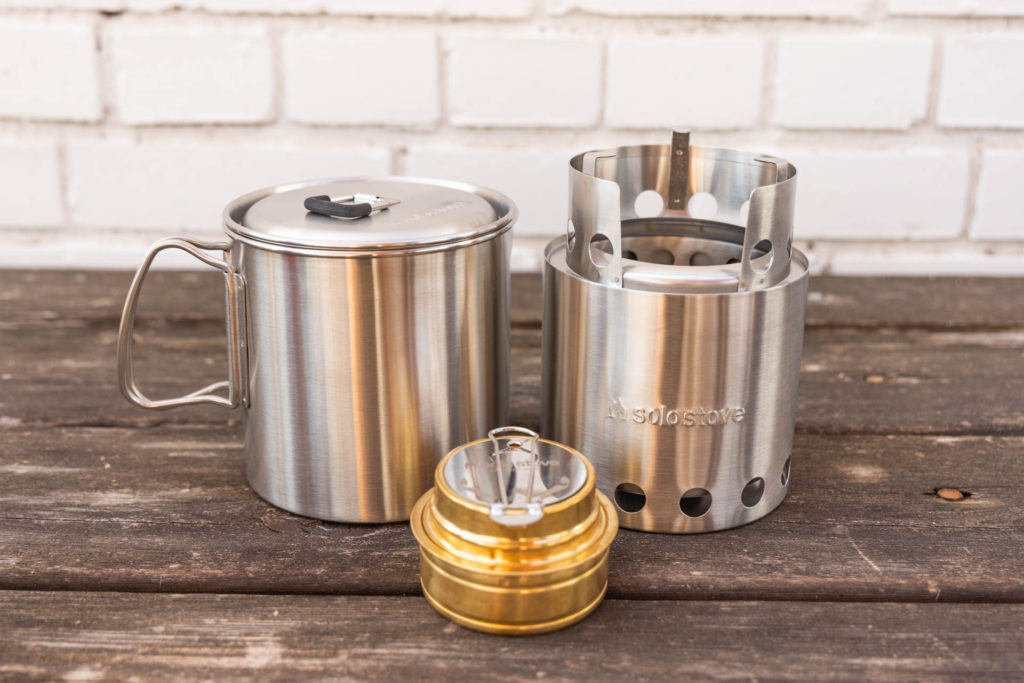
4. Alcohol Stove (aka: The Minimalist)
Then there’s the alcohol stove, a favorite among ultralighters because it’s not only very light and compact, but you also don’t need any special or heavy equipment to carry extra fuel–just a lightweight sealable squeeze bottle or screw-top.
An alcohol stove is simple a small, specially-designed, metal vessel that you pour denatured alcohol into, light, wait a minute or two, then place your pot on top of. Most don’t recommend placing your pot directly on top of the tiny stove, but you can get a setup like the Solo Stove Lite to place the alcohol burner inside of, then place your pot on top of the larger stove. You can also use something as simple as a soda can with holes strategically punched in it or 3 or 4 tent stakes placed upright into the soil around the burner to place your pot on top of.
Pros:
- Stoves and fuel are super light: just 180 grams for the stove and .5 oz per fuel cube.
- Create as simple or elaborate cooking setup as suits you.
- Bring as much fuel as you need (though bringing a little extra is highly recommended).
- No heavy empty fuel containers to pack out.
- Fuel and stoves are inexpensive: A quart of denatured alcohol costs $7, the Solo Stove alcohol burner $25.
- Fuel lights easily and burn reliably in any temperature conditions, including sub-zero climates.
- Fuel comes in easily recyclable metal containers and can be packing in reusable containers.
Cons:
- Boils a cup of water slowly: 5.5 to 6 minutes.
- Requires extra care so as not to spill alcohol in your bag or around your campsite.
- Denatured alcohol can be tough to find–check paint stores instead of outdoor stores.
- No control over temperature, so it’s best for just boiling water.
Who Alcohol Stoves are For
Alcohol may be a bit heavier than solid fuel tablets, but it’s reliable in all temperatures and is nice and compact. And while you can use it with a well-designed stove kit like the Solo Stove Lite, you can strip down your kit and improvise with what you have just as easily, making it suitable for new and experienced backpackers alike.
But denatured alcohol may not be as readily available and you do have to take extra care not to spill it all, plus it may take some practice to learn how much you need to pack for any given trip. That said, this one is another good option for versatility in a wide range of weather conditions, but a little more hands-on than a solid fuel stove.
Find the Solo Stove alcohol stove here.
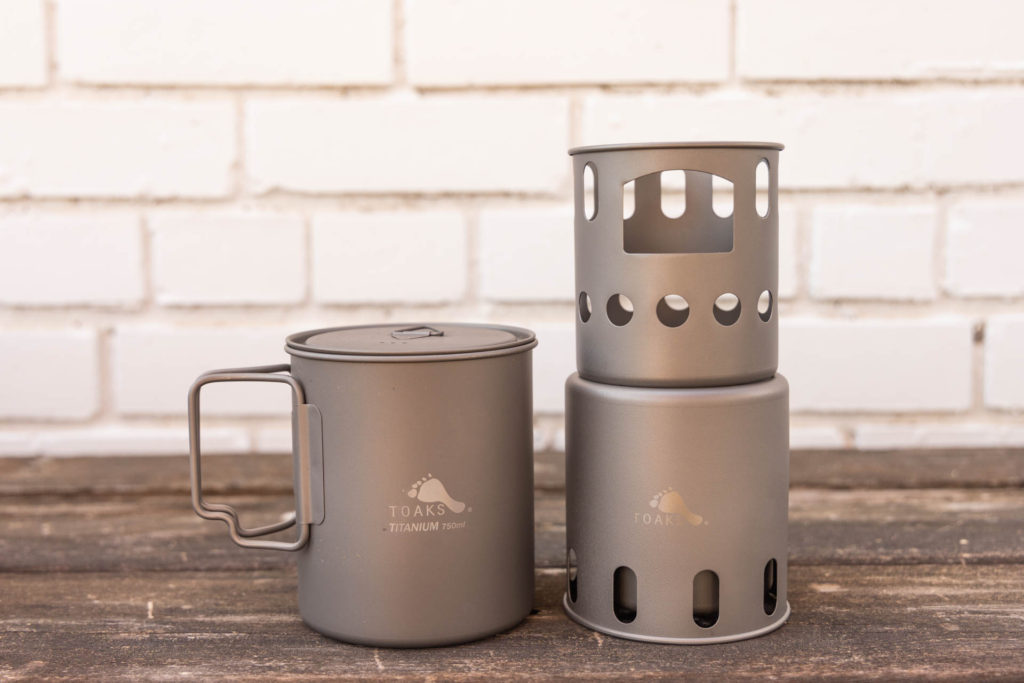
5. Wood-Burning Stove (aka: The Minimalist)
Last but not least is the not-so-humble wood-burning stove. We’ve tested wood-burning camp stoves like the BioLite CampStove 2 before, but there also lighter models designed for backpacking. Generally comprised of two or three parts, it’s a simple and streamlined cooking system that requires minimal setup, no fuel, and zero waste. Some wood-burning backpacking stoves like this Toaks model, are even supremely ultralight.
All that’s required is to setup the stove per manufacturers directions, then collect fuel from your surroundings: sticks, twigs, etc. Place them inside the stove, light, then continue to add more sticks slowly until your water is boiling. When cooking is done, let the small fire burn out.
Pros:
- Stoves can be super light: this Toaks is just 5.4 oz.
- No packing fuel or carrying empty canisters required.
- Stoves aren’t too expensive ($45), plus fuel (sticks and twigs) is free.
- Can also be fueled by pellets or other solid fuel sources.
- Can be used in most temperatures.
- Can be paired with a solid fuel tablet or alcohol burner.
- Zero waste: no fuel packaging to trash or recycle.
Cons:
- Cook times will vary depending on conditions and the sticks you use: 3 to 10 minutes.
- No control over temperature, so it’s best for just boiling water.
- Requires vigilance when adding fuel so the fire doesn’t go out.
- Can’t be used in regions with fire bans.
- Stoves can take a while to cool down after cooking.
Who Wood-Burning Stoves are For
Wood-burning stoves are perfect for any temperature and great for those who either hate paying for or carrying fuel or don’t have easy and constant access to it. They are supremely ultralight and space-saving: this small Toaks stove nests inside a 650ml Toaks pot. They may take a few tries to get the hang of, but can be very versatile. But these stoves are best for backpackers who aren’t in a hurry to either cook or leave camp.
Additionally, if you are camping in regions where there aren’t any sticks to pick up off the ground, or if it’s winter and everything on the ground is covered in snow, you might be hard-pressed to find fuel, so plan ahead and consider carrying a backup fuel source like pellets or this edible fuel, just in case.
But unlike every other stove on this list, a wood-burning stove is the only one that doesn’t result in any fuel trash or packaging ever, plus the all-metal body is easily recycled at the end of its life, which means it’s the most sustainable option.
Find the Toaks wood-burning stove at REI here or Garage Grown Gear here.
The Best Backpacking Stoves: Bottom Line
So there ya have it! All the major types of backpacking stoves all in one place. Do you use another, more obscure backpacking stove? Tell us about it in the comments below!
Then get out there, fire up your camp stove, cook that ramen to perfection, and wander on.
•
Want more camp cooking content? Check out our favorite mess kits here and a backcountry cookbook here.